Tools Day: Swedish Weaving Draft

Cooks have recipes, builders have blueprints, and handweavers have weaving drafts. There are a few different formats, but all drafts carry the same essential information. There is the tie-up box, the threading pattern, and the treadling sequence. Finally, there’s the drawdown, a graphic representation of how all the threads intersect.

The two formats I see most often are the typical American draft (e.g., Handwoven), and the Swedish draft (e.g., VÄV Magasinet). Many American drafts assume jack looms; whereas, Swedish drafts usually assume counterbalance or countermarch looms. However, any loom can weave from any draft.

As Madelyn van der Hoogt says in The Complete Book of Drafting, “Any tie-up can be used for any type of loom. Discover from the tie-up which shafts must be up and which down for each shed, and do to the loom whatever is required to get them there.”

All the draft formats have this in common: The tie-up box is the starting point. The threading pattern and treadling sequence begin at that point, and go out from there.

The Swedish draft makes perfect sense (remember, of course, I weave on Swedish countermarch looms). I picture the draft as if it is lying flat in front of me.

Becky Ashenden says in the forward to Weave Structures the Swedish Way, “With this orientation of tie-up, treadling, and threading, the draft has a direct relationship to the weaving of the fabric. The tie-up’s location in the lower right-hand corner of the draft allows all other information to match as closely as possible the physical aspects of the loom.”

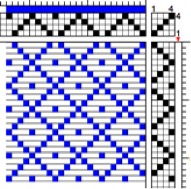
Here is a comparison of the Swedish and American draft formats:

Swedish Draft

Reading a Swedish draft.
Swedish draft, with a weft drawdown.
  • Weft drawdown (filled-in squares show lowered warp threads, weft passing over)
  • Tie-up is in lower right corner, and uses black squares to designate shafts that sink / white squares for shafts that rise
  • Threading is below the drawdown
  • Shafts are numbered from back of the loom to front, with the first shaft the furthest from the weaver seated at the loom
  • Treadling sequence is on the right, and reads from bottom to top
  • Treadles are numbered from right to left
  • For a “sinking shed” loom (countermarch or counterbalance loom), use the black squares to tie up sinking shafts
  • For a “rising shed loom” (jack loom), use the white squares to tie up rising shafts

American Draft

Reading weaving drafts.
American draft, with a warp drawdown.
  • Warp drawdown (filled-in squares show raised warp threads, weft passing under)
  • Tie-up is in upper right corner, and uses numerals to designate shafts that rise / white squares for shafts that sink
  • Threading is above the drawdown
  • Shafts are numbered from front of loom to the back, with the first shaft the closest to the weaver seated at the loom
  • Treadling sequence is on the right, and reads from top to bottom
  • Treadles are numbered from left to right
  • For a “sinking shed” loom (countermarch or counterbalance loom), use the white squares to tie up sinking shafts
  • For a “rising shed loom” (jack loom), use the squares with numerals to tie up rising shafts

Similarities between Swedish and American Drafts

  • Threading reads right to left
  • Squares in the tie-up box represent treadle cords that attach treadles to corresponding shafts
Weaving draft in place for weaving mug rugs.
Draft is hanging at the corner of the loom. The fabric logically grows in the same direction as the sequence of weft picks as seen on the treadling draft.

Resources
Getzmann, Ulla, and Becky Ashenden. Weave Structures the Swedish Way. Shelburne, MA: Väv Stuga Press, 2006.
Hoogt, Madelyn Van der. The Complete Book of Drafting for Handweavers. Coupeville, WA: Shuttle-Craft Books, 1993.

May you flourish at your loom.

All the best,
Karen

Linen Butterflies

This project has been on my mind for a long time. But I purposely waited to begin until I could weave it on my new sweet little loom with a view. Four Decorative Sample Strips, it’s called in The Big Book of Weaving, by Laila Lundell. It includes four-shaft tapestry, as well as weft inlay techniques. Each of the four strips will be a sampling of 8-12 different patterns or techniques. The weft is all linen, in various colors and sizes. Several strands are bundled together and made into butterflies. I have the sections mapped out, but the actual designing is happening at the loom.

Box of colorful linen for a tapestry project!
Box of linen! A variety of 16/2 line linen, 6/1 tow linen, and 8/1 tow linen.
Weft inlay with linen butterflies.
First sample strip starts with some weft inlay.
Linen butterflies.
Linen butterflies.

The box of vibrant shades of linen that sits by the loom makes me think of the wonderful colors in creation. The Grand Weaver puts an assortment of strands together, making something as only He can. The world belongs to its Maker. We are His. Sometimes we forget that it is not that He is in our universe, it is that we are in His. I love the way He puts an assortment of us together to put a splash of color on His tapestry.

May you enjoy the colors around you.

Happy weaving,
Karen

Sweet Little Loom with a View!

Steve thought I should have another loom, so he used his carpentry skills to build a 27-inch Swedish-style four-shaft countermarch loom! It’s beautiful. It’s incredible! In preparation for retirement in a few years, we found a place in beautiful Texas hill country to call (our future) home. For now, it’s a place to gather with children and grandchildren on occasional weekends. And a place to put a sweet little loom.

Making weaving loom parts.
Making weaving loom parts. Treadles.
Six treadles ready.
Putting the new little handbuilt loom together!
Final Touch. Tightening the cradles for the top of the hanging beater.
Maiden warp for a new sweet little loom.
Putting on the maiden warp of 12/9 cotton seine twine.
Ready to take the loom apart to move it.
Loom is ready to be disassembled. Warp is wrapped up on the warp beam. Blue duffel bags will hold all the loom parts except for the side frames and the beater, to be transported to the new location.

And it only gets better. We situated the petite loom by the corner windows in the living room. At the loom, I have the best seat in the house, with an amazing view of God’s creation. The loom tells me my husband knows me very well. And the view tells me the Lord knows me, too.

Loom with a view! Texas hill country.
Threading heddles while enjoying the hill country view!
Grandchildren, loom, view... heaven on earth!
Can there be a better setting? Grandchildren playing, loom, view…
Sweet little loom with a view!
Sweet little loom with a view! Heavenly!

None of us can come to God on our own terms. Not by our wisdom. Not by our strength. Only through humility do we find God. Humility opens our heart to God. That’s when we see how much He has done to get our attention to tell us He knows us and loves us. My special loom with a view is an example of what it’s like to be known and deeply loved.

May you know you are loved.

Blessings,
Karen

Making Hanging Tabs for Towels

It’s this kind of detail that takes a handcrafted item up a notch. A hanging tab made from a handwoven band is more than an accent for a handwoven hand towel. The small hanging tab, mostly unnoticed, adds a statement: This towel has a purpose. It is meant to be placed where it will be used.

How to Make Hanging Tabs for Towels from a Handwoven Band:

  • Mark cutting lines on the woven band. My lines are 4 1/4″ apart.
  • Zigzag forward and back on both sides of the marked lines, leaving room for cutting apart.

Zigzag between hanging tabs.

Making hanging tabs for towels.

  • Cut the band apart at the marked lines, between the zigzag rows.

Hanging tabs, cut apart for towels.

  • Decide where and how to place the hanging tab.

Trying different versions of hanging tabs.

One style of hanging tab for handwoven towel.

Handwoven band for hanging tab on towels.

Loop for hanging tab on towel. Handwoven band.

  • Position the tab, and push the zigzagged ends to the fold inside the pressed and folded towel hem. Pin or clip in place.

Adding handwoven band to hand towel.

  • Stitch the towel hem, securely catching the ends of the hanging tab.

Adding hanging tab to handwoven towel.

Finished handwoven linen-cotton towel with hanging tab.

  • Use the towel. Enjoy!

Handwoven towels being used!

Your prayers matter. Pray a blessing on your children and grandchildren. Your prayers add a detail to their lives that sets them apart. The blessing we ask is that they know the Lord. That they will call on the Lord. That they will say they belong to the Lord. Ultimately, our prayer is for the Lord to place them where they live out the purpose for which he has designed them.

May your prayers reach the heart of God.

With purpose,
Karen